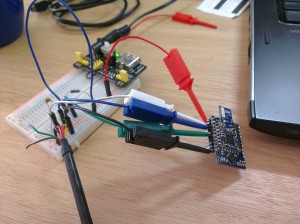
Debugging Justop K10A

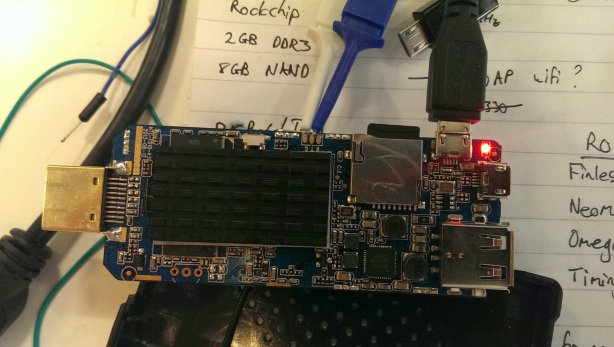
I’ve been doing some work with Rockchip RK3188 devices and since there are so many of them which are so similar and no information about the particular device I am using I though I’d post a pic showing the debug serial port of the Justop K10A device. It is helpfully labelled G T R which is of course Ground Transmit and Receive. Note this is 3V3 level TTL.

Image  —  Posted: January 18, 2014 in Uncategorized
Tags: ,

I’ve been exploring the world of linux containers a bit lately and so I thought I’d write a quick tutorial on how to set up the Raspberry Pi (my go to remote embedded build machine) to build Docker from source. If you don’t know what Docker is then you should do yourself a favour and read up about it from their site. It’s a truly amazing piece of software and I’m hoping to use it for instances of node applications as well as embedded build instances in the future. For now lets just build it. As a forewarning I have built my own 3.12 kernel for this particular Raspberry Pi so if something doesn’t work on the default Raspbian image that could be why.

First up install the userspace tools for linux containers. You could of course install the ‘lxc’ package from the repositories but at this time it is on version 0.8.0-rc1 and as I’m building everything bleeding edge I’m sure you’ll need the latest version.

sudo apt-get install libcap-dev
cd /opt
sudo git clone https://github.com/lxc/lxc.git
cd lxc
sudo ./autogen.sh && sudo ./configure && sudo make && sudo make install
lxc-version
lxc version: 1.0.0.beta1

Next we need to get go. Again we could install the ‘golang’ package but this is the 1.0.2 version and 1.1 version contains many improvements for ARM. So I’ve chosen to get a precompiled version.

cd /opt
sudo wget -c http://dave.cheney.net/paste/go1.2rc1.linux-arm~multiarch-armv6-1.tar.gz
sudo tar -C /usr/local -xzf go1.2rc1.linux-arm~multiarch-armv6-1.tar.gz
Add export PATH=$PATH:/usr/local/go/bin to your ~/.profile or /etc/profile
go version
go version devel +5b367120d592 Thu Sep 19 17:12:00 2013 +1000 linux/arm

Building from source is also pretty easy

curl https://go.googlecode.com/files/go1.2.src.tar.gz | tar xz -C /usr/local
cd /usr/local/go/src
./make.bash
go version go1.2 linux/arm

I have included the AUFS patches from here into my kernel but from docker version 0.7 you do not explicitly need them. Patching is done by compying in the new sources and then running the patches from the root of your kernel source tree.

AUFS-Utils is also useful if you plan on using this feature.

cd /opt
sudo git clone git://git.code.sf.net/p/aufs/aufs-util
cd aufs-util
sudo git checkout aufs3.x-rcN
sudo make && sudo make install

The most difficult part of this whole process is the fact that the docker build system uses docker containers to build itself so you need to have docker to build docker. The guys at resin.io have made things a whole lot easier by publishing a raspberry pi built docker binary. This can be found here, extracted and used.

docker -v
Docker version 0.7.2, build 28b162e-dirty

Building from source can then be completed using the standard installation instructions from the docker website.

An interesting discovery

Posted: November 14, 2013 in Uncategorized

I’ve been poking around in the sources for the rowboat project, which is the Android for TI ARM processors, and have made an interesting discovery. It seems the Texas Instruments are going to be releasing a new processor soon as from the sources here there has been a flurry of activity for something called the AM43XX and the device-ti-am437xevm. Now maybe I’m just behind on my news but I certainly have never heard of this processor or board before. It seems that neither has TI because their website does not mention anything about this series.

From the Android board configuration it seems that this is as follows:

TARGET_ARCH := arm
TARGET_ARCH_VARIANT := armv7-a-neon
TARGET_CPU_VARIANT := cortex-a9

Also seems to contain the usual batch of accelerometer, light sensor, camera, bluetooth which we expect on an Android device. Also the kernel version they are building for it is 3.12 which is refreshing as other devices on this site are still stuck on 3.2.

I for one am very excited to see where this goes…

I’ve been doing some Linux work again lately and so it back to bootloaders. Every time I work on a new product I have to do this so I thought I’d write up a post about it. Usually the vendors provide a working u-boot source tree but more often than not it’s pretty old and I’ve been playing around with putting together a multi architecture kernel so I’d like have device tree support in my bootloader. So here is the procedure. First get the sources and start a branch for your project:

git clone git://git.denx.de/u-boot.git
git checkout -b project-name

If you’re going to be working on this for multiple projects I suggest starting a fork and the easiest way to do that is with Github. Then if you want to update your master branch to the latest from U-Boot all you need to do is add a git remote and merge the changes in.

git remote add upstream git://git.denx.de/u-boot.git
git fetch upstream
git checkout master
git merge upstream/master

The name upstream is just a generic name, you could call in denx or uboot or whatever you want. Next you need to create the location for your sources and the way in which U-Boot does that is in the board folder. In this folder add a folder with your company name and then a folder with the name of the project you’re working on. ./board/acme/rocket The easiest way to start with this is to copy the sources from another board which uses the same processor. Your folder will now usually look as follows:

board -> acme -> rocket.c
|-> rocket.h
\-> Makefile

Next you need to add your configuration file and tell the build system about your new project. This is again easiest done by copying the configuration file of the board that is most similar to yours. The configuration files are located in ./include/configs/rocket.h Instructing the build system is done by editing the boards.cfg file in the root. This file is kept in alphabetical order so you should add it in the same manner. It’s form is:

Status, Arch, CPU:SPLCPU, SoC, Vendor, Board name, Target, Options, Maintainers
Active, arm, armv7, am33xx, acme, rocket, rocket, -, me@myemail.com

You may also want to add an entry to ./arch/arm/include/asm/mach-types.h so that U-Boot can tell the Linux kernel that it’s your custom board that is booting and this should be in the form #define MACH_TYPE_ROCKET 9999 Just make sure it is a unique number. That is why I usually add it as a high number as new board are being added to the sources all the time. Now you can make your changes to your configuration and board sources and when you are ready to compile just run:

make ARCH=arm CROSS_COMPILE=arm-linux-gnueabihf- distclean
make ARCH=arm CROSS_COMPILE=arm-linux-gnueabihf- rocket_config
make ARCH=arm CROSS_COMPILE=arm-linux-gnueabihf-

There is obviously a lot more to this process and there are a fair few edits to these instructions that may need to be made for you system but it’s a good start. I hope this is helpful to someone and if you need a hand with something similar give me a shout. I’ll write another post about the kernel and device tree when I get a chance. It really is an amazing system!
RFM12B Linux Module

I found this great project the other day. I’ve been meaning to write something like this for ages. It will really help expand my home projects. I will integrate it into my EVE Raspberry Pi as soon as I get some time to play. SO helpful!

Link  —  Posted: July 8, 2013 in Uncategorized
Tags: , , ,

I’m not really any further with any projects to speak of but it feels good to get some personal coding done. This weekend I’ve been playing around with the RFu-328 modules with SRF from Ciseco. I’ve been trying to get ChibiOS/RT running on them as I think it’ll be great to have a small footprint RTOS which runs on 8 bit micros. Task switching and sleeping during idle will do great things for my wireless nodes. So far I have the basic RTOS running with a thread for processing serial LLAP activity and then a semaphore to signal another to process the data received if it is all in order. Currently I am trying to move from the nodes sending data periodically to being able to be polled by the master. This will help prevent collisions as well as stop me from having to update the firmware on the nodes if I make changes to the system. So for now I’m trying to implement Pinata so I can control all the pins on an Arduino compatible unit. I’m not quite there yet but it’s a good start for a weekend. Code, as always, available on my github.

To get this going I’ve gone back and updated my EVE-node application with all the things I’ve learnt from doing the raspberry pi application at work. This application is nowhere near ready for everday use but if I keep cracking on it will be really useful very soon.

I was asked recently by our mechanical team at work to help them with a little project that involved building a pneumatic test rig to stress test our product. It was designed to do things like electrical stress tests like powering the device on and off a million times, mechanical tests like plugging and unplugging a USB cable and touching the touch screen. They had me a pneumatic.

The rig is powered by a raspberry pi with a PiFace for the relays and I/O. The interface is written in Node.JS with Angular for the frontend. It was a really great project (simple as it may be) and has been a great excuse to dive into node properly. It’s power continues to astound me and Angular’s bidirectional bindings really makes it easy to give powerful embedded projects a UI. It scales up really well to so you don’t have to worry about changing technologies later. The code is available on my github as usual.

I know this video is not very exciting but I think it’s cool. I’m also working on getting the low level SPI bindings working properly. More on that in a future post but node-gyp is incredible and node-ffi is so incredibly powerful for quick external library bindings.

Video  —  Posted: June 21, 2013 in Nodejs, Raspberry Pi
Tags: , , ,

Over the last week or so I have been playing around with getting Node.js up and running on my Raspberry Pi. I have found it to be a great learning experience and I’m pretty sure I will be using it for all of my embedded UI projects from now on. With the help of frame works like Express getting a static site up and running is really easy and Socket.io makes communications really easy too. As I posted before I have been playing with these SRF modules to get some wireless comms going for home automation and I used python to get up and running fast. Afterwards I decided to use this as a opportunity to get in Node as I’ve wanted to try it out for a while but always need a project to apply myself to. This is still a long way off but have a look at the first working version https://github.com/rosterloh/EVE-node. More as I carry on discovering!

Sites like Kickstarter and Indiegogo make me very excited. They really do give opportunities to projects that probably never would have seen the light of day. A recent project to build a affordable 3D scanner has caught my eye. Have a look and see what you think.

Photon 3D Scanner

Photon Image

Photon 3D Scanner

Link  —  Posted: April 23, 2013 in Crowdfunding
Tags: , ,

I had a little time to play around this weekend so I got out some toys I’ve been meaning to play with and got a few things up and running. My EVE board has been lying around collecting dust so I assembled the RFM12B and the Ciseco SRF modules along with a TMP100 on board temperature sensor. The EVE board has 2 locations where the SRF module can be fitted but I put it on the 868MHz location as that’s the frequency I am using. The PCB is routed such that the Pi can communicate with it via SPI on SS0 but it also has pads for the serial connection which is a blessing as the firmware that the module is shipped with uses serial and not SPI. Although you can OTA program these devices since I don’t have any radio modules that can easily connect to a PC I just hooked up an FTDI adapter to the serial port and programmed them using their XCM tool. The firmware image can be found here.

RFu328

I also have one of their Arduino compatible boards with a footprint for the same SFR module on the Pi so I programmed that up with the RFu328 code (I used the beta firmware) and put a small sketch on there which periodically reads the temperature and humidity values from a DHT22 sensor and sends them out to anyone listening. The protocol used to send these packets is LLAP which is really basic but gets the job done. CRC and other such things are handled in hardware so that is not required in the protocol. After that it was easy enough write a python script on the Raspberry Pi to read the values and for now just posts them to COSM.

Next phase I’m going to set up some web sockets and have a play around with some HTML5. All in all it was a fun little weekend project and I am most happy with how far it’s come.

I would also like to change this so that the sensors do no just present the data but rather are polled. While I’m at it I’d also like to build in standard inputs and outputs so I don’t have to change the code if I want to add a few basics later.